
You can have a working custom domain email address today. The full process, buying a domain, picking a host, publishing four DNS records, creating a mailbox, and testing it, usually takes 15 to 30 minutes of active work, though DNS propagation can stretch that timeline to as long as 48 hours in rare cases.
Here's the checklist:
- Buy or confirm you control a domain (skip if you already own one).
- Choose an email host separate from your registrar.
- Add four DNS records: MX, SPF, DKIM, and DMARC, in that order.
- Create your first mailbox and send a test email.
Most small businesses pay a modest amount per mailbox each month on a paid host, though free tiers exist with real limits. If you already own a domain, your next move is confirming DNS access at your registrar. If not, buy one first, then come back here.
Key Takeaways
A working domain email setup requires registering a domain separate from your mailbox host, publishing MX, SPF, DKIM, and DMARC in that exact order, and testing authentication before enforcing DMARC policy.
| Point | Details |
|---|---|
| Separate registrar and host | Keep your domain registrar different from your mailbox host to protect future migration options. |
| Publish DNS records in order | Add MX first, confirm inbound mail, then SPF and DKIM, then DMARC at p=none. |
| Budget realistic time | Expect 15 to 30 minutes of active setup, with DNS propagation taking up to 48 hours in rare cases. |
| Prefer CNAME-based DKIM | It lets your host rotate signing keys without repeated manual DNS edits. |
| Verify before enforcing | Check spf=pass, dkim=pass, and dmarc=pass in message headers before moving DMARC to a rejection policy. |
Table of Contents
- Step 1: Register a Domain or Confirm You Control It
- Step 2: Choose an Email Host and Plan for Portability
- What DNS Records Does Domain Email Configuration Require?
- Step 4: Create Mailboxes and Secure Every Account
- Step 5: Connect Your Email to Phones and Desktop Apps
- How Do You Verify SPF, DKIM, and DMARC Are Working?
- Fixing the Most Common Setup Failures
- How Epdwebsites Handles Domain Email Setup for Clients
- Setting Up Email Forwarding
- Compliance and Privacy Considerations for Domain Email
- What Setup Guides Usually Get Wrong
- Sources
Step 1: Register a Domain or Confirm You Control It
Everything downstream depends on DNS access, so this step decides how smooth the rest of your domain email setup goes. If you already have a domain for your business site, you likely control it already. If not, buy one now, and buy it somewhere other than where you plan to host mail.
Keeping the registrar separate from your mailbox host is one of the six portability decisions that determine whether a future migration takes minutes or weeks. Registrars like Cloudflare Registrar, Namecheap, and Porkbun work fine for this purpose. None of them force you into their own email product, which keeps your options open.
A few practical notes on the domain itself:
- Stick with a
.comwhen possible. It reads as more credible to clients checking your law firm, CPA practice, or consultancy, and it avoids the "is this a real business?" hesitation newer extensions can trigger. - Avoid signing up for a bundled email add-on at checkout just because it's the default option. You can add mail hosting separately, and often more cheaply, once the domain is secured.
- Consider WHOIS/domain privacy at signup. It's a standard registrar setting that keeps your contact details off public lookup databases, and most registrars offer it free or for a few dollars a year.
Once the domain is yours, find the DNS panel. Nearly every registrar uses some version of Domain → DNS → Records (or "Manage DNS"). You'll return to this exact screen in Step 3 to add mail records. Some hosts verify ownership before activation, usually through a TXT record you paste into that same DNS panel, or occasionally a small file uploaded to your site. Either method takes under five minutes.
Step 2: Choose an Email Host and Plan for Portability
Your host choice shapes cost, features, and how painful a future switch will be. Four categories cover almost every small business scenario.
Full productivity suites like Google Workspace and Microsoft 365 bundle mail with document editing, video calls, and shared drives. They cost more per mailbox but make sense if you need those collaboration tools anyway. Dedicated mailbox hosts focus purely on email, often at lower cost and with cleaner interfaces. Zoho Mail sits in a budget tier of its own, offering a free plan for up to five users, though the free tier restricts IMAP access, which matters if you want to check mail from multiple devices. Registrar-bundled cPanel email comes free or cheap with some hosting plans, but it's usually the least portable option and the easiest to outgrow.
Before you sign up anywhere, check for three things:
- Server-side IMAP migration support, so switching hosts later doesn't mean manually re-downloading every message.
- DKIM setup via CNAME rather than a static TXT record, which lets the host rotate signing keys without you touching DNS again.
- A visible, documented export tool, not a support ticket you have to file to get your own data out.
Cost expectations are modest. Paid entry-level plans typically run $1 to $6 per mailbox per month, with the productivity suites at the higher end and dedicated mailbox hosts often cheaper. Free tiers exist but usually cap user count or restrict protocol access.
Pro Tip: If you don't need shared calendars or collaborative docs, skip the full suite. A lightweight mailbox host with strong IMAP support and CNAME-based DKIM will save you money now and headaches during any future migration.
For most solo practitioners and small firms, a dedicated mailbox host is the practical default. Reserve Google Workspace or Microsoft 365 for teams that genuinely use the collaboration features, and avoid registrar mailbox add-ons unless you're certain you'll never need to move.
What DNS Records Does Domain Email Configuration Require?
Four DNS records make up the entire technical backbone of domain email configuration: MX, SPF, DKIM, and DMARC. Publish them in that order, and your setup avoids the single most common failure mode: blocking your own legitimate mail before authentication is fully verified.
Here's what each record does and roughly what it looks like:
- MX (Mail Exchange) tells the internet which servers receive mail for your domain. A typical record points to something like
mx1.yourhost.comwith a priority value. Publish this first and confirm you can receive a test message before touching anything else. - SPF (Sender Policy Framework) is a TXT record listing which servers are allowed to send mail on your domain's behalf, something like
v=spf1 include:_spf.yourhost.com ~all. It stops other servers from convincingly spoofing your address. - DKIM (DomainKeys Identified Mail) attaches a cryptographic signature to outgoing mail, usually published as either a TXT record with a public key or, better, a CNAME pointing to a key your host manages. CNAME-based DKIM is worth the extra setup click because your host can rotate the signing key without asking you to edit DNS every time.
- DMARC (Domain-based Message Authentication) is a TXT record at
_dmarc.yourdomain.comthat tells receiving servers what to do when SPF or DKIM checks fail. Start with a monitoring-only mode for DMARC, which reports but does not reject messages, before moving to stricter policies.
The staging order matters more than most guides admit. Publish MX and confirm inbound mail works. Then add SPF and DKIM and test outbound delivery. Only after that should DMARC go live, and even then, start it in monitoring mode for about two weeks before enforcing a rejection policy. Skip straight to p=reject on day one, and a misconfigured SPF record can quietly bounce mail from tools you didn't even know were sending on your behalf, like your CRM or invoicing software.
Two paths get you there. Many registrars support Domain Connect, an industry standard that lets your email provider push the correct DNS records automatically once you approve the connection, often through a pop-up authorization screen. Microsoft 365 uses exactly this flow at supported registrars: click "connect," approve the request, and the records appear without you copying a single value by hand. If your registrar isn't on the supported list, Microsoft's own documentation walks through manual verification using a TXT record, MX record, or file upload, and manual DNS entry for the rest.
Pro Tip: If your registrar offers Domain Connect for your chosen host, use it. It cuts out the copy-paste errors that cause the majority of failed authentication checks, especially with long DKIM keys that are easy to truncate by accident.
Step 4: Create Mailboxes and Secure Every Account
Once mail flows correctly, set up the actual addresses people will use. Most small businesses need fewer mailboxes than they expect at first, and adding structure now saves confusion later.
A sensible starting set looks like this:
- firstname.lastname@yourdomain.com for each person, used in direct client communication and signed contracts.
- info@yourdomain.com as a general catch-all for website inquiries and public listings.
- support@yourdomain.com if clients ever need help after the sale.
- billing@yourdomain.com to keep invoices and payment questions out of your main inbox.
Not every one of these needs a full paid mailbox. Aliases, addresses that forward into an existing mailbox rather than storing mail separately, work fine for lower-volume addresses like billing or support, and most hosts include several for free. Reserve full separate mailboxes for people who need their own login, sent folder, and calendar.
Security matters as much as naming. Turn on two-factor authentication for every mailbox, especially the admin account controlling DNS and billing. Set a recovery phone number or backup email on each account, and store the admin login somewhere other than a sticky note or shared spreadsheet, a password manager works better. If you're onboarding several people at once, most hosts support bulk user creation through a CSV upload, which beats adding accounts one at a time through a web form.

Step 5: Connect Your Email to Phones and Desktop Apps
With mailboxes created, connect them to the devices you actually use. Stick to IMAP rather than POP3, since IMAP keeps your mail synced across every device instead of downloading it to just one.
- Use these settings for manual setup: IMAP on port 993 with SSL for incoming mail, and SMTP on port 587 with STARTTLS (or port 465 with SSL) for outgoing. Your username is your full email address, not just the part before the @ sign.
- On iPhone, go to Settings → Mail → Accounts → Add Account → Other → Add Mail Account, then enter your address and password. If you're using iCloud Mail with a custom domain, Apple's setup guide walks through a slightly different path under Settings → iCloud → Mail.
- Outlook and Apple Mail on desktop will usually auto-detect the correct server settings once you enter your email and password, since most major hosts publish autodiscovery records. If auto-detect fails, fall back to the manual IMAP and SMTP settings above.
If you don't want to configure any client at all, your host's webmail interface works as a browser-based fallback and requires zero setup. It's a reasonable option for occasional use, but a real client app tends to feel faster for daily work.
How Do You Verify SPF, DKIM, and DMARC Are Working?
Check the message headers on a real email, not just the DNS records themselves. Send a test message to a Gmail address, then open it and look for "Show original" in the menu. You're looking for three specific results: spf=pass, dkim=pass, and dmarc=pass. Any one showing "fail" or "neutral" means something in your DNS setup needs attention before you move DMARC out of monitoring mode.
Test against more than one provider, since different mail systems check authentication slightly differently:
- Send to a Gmail address and check headers via "Show original."
- Send to an Outlook.com address and check the message source for
Authentication-Results. - Send to a Yahoo address for a third data point.
- Reply to each and confirm the message threads correctly, not just that it arrives.
For DNS-level checks before you even send a test email, tools like MXToolbox, the command-line dig utility, or free online SPF and DKIM checkers will confirm your records are published correctly and readable from outside your network. Propagation timing varies. Most changes are live within an hour, though some registrars take up to 48 hours in unusual cases. If a record you just published isn't showing up in a checker tool after an hour, wait before assuming it's broken. If it's still missing after 24 hours, recheck the record you entered for typos.
Fixing the Most Common Setup Failures
Most domain email problems trace back to one of three symptoms, and each points to a specific, fixable cause.
- No inbound mail at all almost always means the MX record is wrong, missing, or pointed at the wrong host. Double-check the exact value your provider gave you.
- Mail landing in spam usually means SPF or DKIM isn't fully propagated or was entered incorrectly. Recheck both records against your host's documentation.
- Client login or authentication failures typically mean a typo in the IMAP or SMTP server address, or a password that needs to be an app-specific password rather than your regular login.
One registrar quirk worth knowing: Cloudflare's proxy feature (the orange cloud icon) breaks MX records if left enabled on a mail-related entry. Mail DNS records need to stay "DNS only," not proxied.
If something's broken and you can't isolate it quickly, don't keep changing records at random. Roll back to your previous MX setting, save a copy of the failing message's full headers, and hand both to your host's support team with specifics. If you're several hours in with no inbound mail and mounting frustration, that's the point to consider hiring help rather than continuing to guess.
Pro Tip: Before changing any DNS record, screenshot or copy the existing values. A rollback takes thirty seconds if you have the old settings written down, and much longer if you're trying to reconstruct them from memory.
How Epdwebsites Handles Domain Email Setup for Clients
Since 2009, Epdwebsites has built websites and managed hosting for attorneys, CPAs, real estate agents, and other professional service providers who need their online presence to look, and function, like it belongs to a serious business. Domain email setup is part of that same trust package: a client's name should never end in @gmail.com if their website reads as polished and established.
Kate and the Epdwebsites team follow a consistent workflow on client projects:
- Keep the domain registrar separate from the mailbox host from day one, to protect future flexibility.
- Verify DNS ownership and publish MX, SPF, DKIM, and DMARC in the tested order.
- Provision mailboxes with sensible naming, then test deliverability across multiple providers before handoff.
- Transfer admin credentials to the client with documentation, so they're never locked out of their own domain.
A professional email address is one of the smallest technical decisions a business makes, and one of the most visible. Clients notice it before they read a single word on your site.
For businesses that want this handled without touching a DNS panel themselves, Epdwebsites' managed hosting services fold email setup into the broader website build, saving the hours a DIY approach can eat up.
Setting Up Email Forwarding
Forwarding sends copies of incoming mail from one address to another without requiring a separate mailbox, and it's useful in a handful of specific situations. A sole practitioner might forward contracts@yourdomain.com straight to their main inbox instead of checking a second mailbox all day. A growing team might forward a general hello@ address to two people at once during a busy season.
Setting it up takes place inside your host's admin panel, not in DNS, in most cases. Look for a section labeled "Forwarding," "Aliases," or "Routing rules," add the source address, and specify the destination mailbox. Most hosts let you forward to multiple recipients simultaneously and let you choose whether a copy stays in the original mailbox or forwards exclusively.
One catch worth knowing: forwarding can occasionally interfere with SPF checks on the receiving end, since the forwarding server isn't the original sender. Most modern mail hosts handle this correctly by rewriting headers, but if forwarded mail starts landing in spam at the destination, that's the first thing to check. Test any forwarding rule the same way you tested your main setup: send a message, confirm it arrives, and check headers if anything looks off.
Forwarding works well as a lightweight bridge, but it's not a substitute for a proper mailbox if you need sent-mail history, search, or a professional reply-from address that matches the one receiving mail.
Compliance and Privacy Considerations for Domain Email
Running your own domain email means you're also responsible for how that mail handles personal data, especially if you're in a regulated field like law or healthcare. This isn't a full legal framework, just the practical points worth knowing before you rely on your setup for client communication.
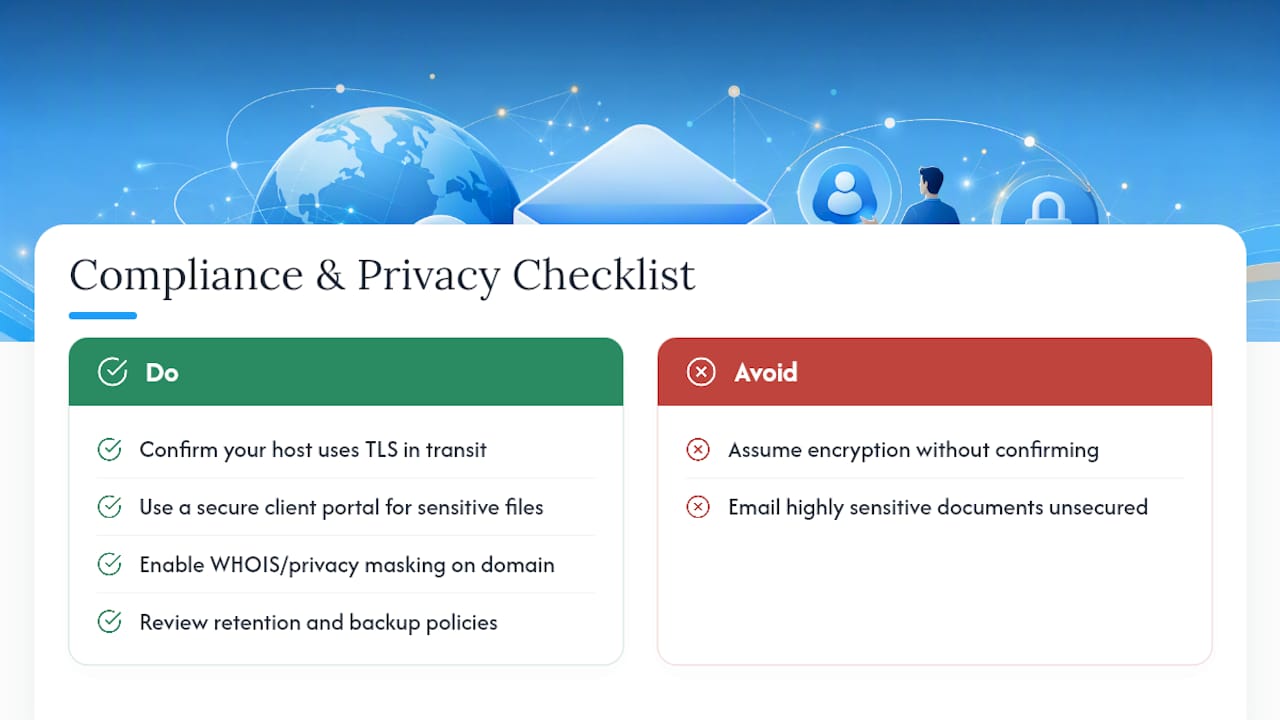
Encryption in transit matters more than most people realize. Most modern mail hosts encrypt traffic between servers by default (TLS), but it's worth confirming with your specific host rather than assuming. If you handle sensitive client documents by email, attorney client files, medical records, financial statements, consider whether email is even the right transmission method, or whether a secure client portal makes more sense for that specific document type.
Domain privacy, the WHOIS masking mentioned in Step 1, keeps your registration contact details off public lookup tools, which matters if you're a solo practitioner listing your home address as your business address. Retention policies deserve a look too: know how long your host keeps deleted mail and backups, since that affects both your own recovery options and any data requests you might receive from clients or regulators.
None of this replaces guidance specific to your profession or jurisdiction. A CPA's obligations around client financial data differ from a healthcare practice's obligations under health privacy rules, and a general domain email setup guide can't substitute for advice tailored to your specific regulatory environment.
What Setup Guides Usually Get Wrong
The advice that circulates most, buy any domain, pick whatever email plan looks cheapest, add DNS records in whatever order the host lists them, works often enough that its flaws don't show up immediately. They show up three months later, when a business needs to switch hosts and discovers migrating hundreds of old emails means downloading and re-uploading everything by hand.
The order of operations gets undersold too. Plenty of guides list SPF, DKIM, and DMARC as three items on a checklist with no sequence implied. That's how legitimate mail gets accidentally rejected, when DMARC enforcement goes live before SPF and DKIM have actually been confirmed working.
If there's one thing worth fixing about how this topic usually gets taught, it's this: portability and staging order aren't advanced details to worry about later. They're decided in the first ten minutes, at signup and at the first DNS edit, and they're nearly impossible to undo cheaply afterward. Get the registrar separation and the DKIM method right on day one. Everything else on this list is reversible. That one mostly isn't.
— Kate
Sources
These are the authoritative documents to keep open while you work through setup:
- Add a custom domain to Microsoft 365
- How to Set Up Business Email: Step-by-Step Guide (2026)
- Custom Email Address Setup — TrekMail