
A medical website before and after gallery is a structured visual display of patient treatment results that builds credibility and drives consultation bookings. Done right, a medical website before after gallery setup can be the single most persuasive element on your practice's website. High-converting medical websites with trust signals like these galleries achieve 2–5x higher patient conversion rates. That number reflects a simple truth: patients want proof before they commit to a procedure.
The industry term for this feature is a "clinical results gallery" or "patient outcomes gallery." Both terms appear in healthcare web design standards. The SEO phrase "before and after gallery" is what patients type into search engines, so you will see both used throughout this guide.
What does a medical website before after gallery setup require?
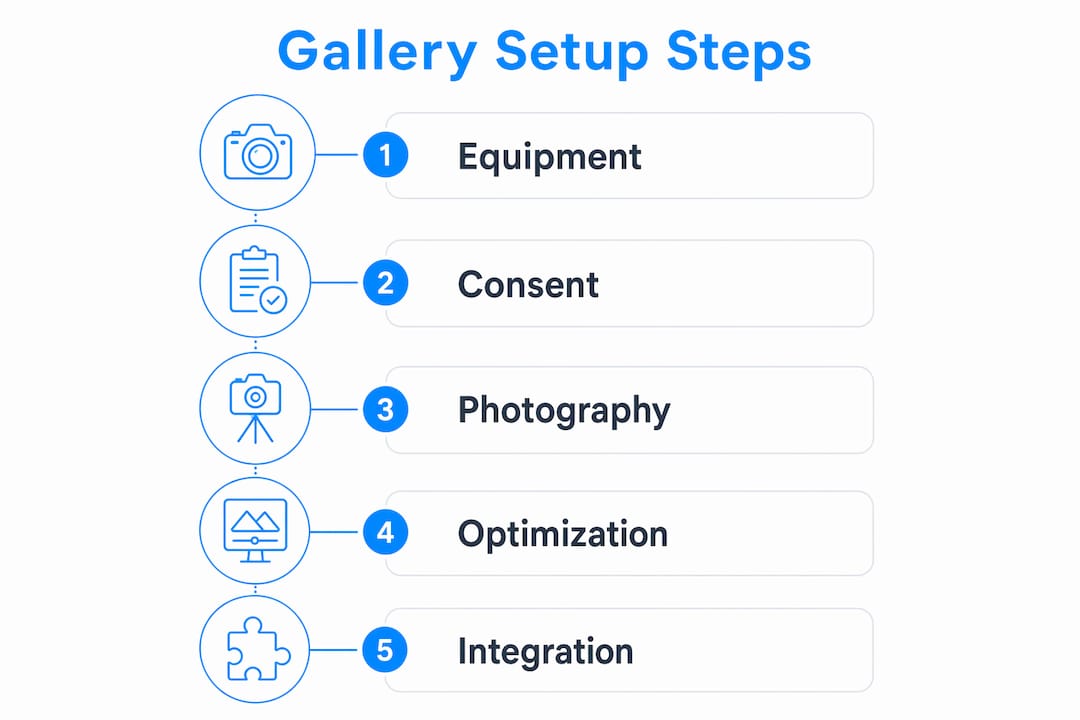
Before you publish a single image, three foundations must be in place: the right equipment, a consent workflow, and a technically sound website.
Photography equipment
You do not need a professional photography studio. You do need consistency. A mirrorless or DSLR camera with a 50mm or 85mm lens produces clinical-grade images without distortion. A neutral gray or white background eliminates visual noise. Two identical LED panels positioned at 45° angles to the patient provide consistent, shadow-free lighting that makes results look professional and trustworthy. Mark floor positions with tape so every staff member places the patient in the exact same spot.
Consent management
Consent is not optional and it is not a checkbox. Digital consent workflows that capture e-signatures via tablet or SMS and attach authorization directly to each photo file prevent HIPAA compliance issues before they start. Every photo in your gallery must trace back to a signed, dated consent document stored in encrypted, access-controlled storage.

Website technical requirements
Your website must support WebP image format, lazy loading, and a page load time under 3 seconds. These are not suggestions. WebP images at 85% quality reduce file size without visible quality loss, and pages that load in under 3 seconds reduce patient drop-off significantly. If your current platform cannot handle these requirements, your gallery will hurt your site's performance rather than help it.
Pro Tip: Build a pre-shoot checklist that covers background setup, lighting position, camera settings, and consent status. Laminate it and post it in your photo room. Consistency starts with process, not talent.
| Requirement | Standard |
|---|---|
| Image format | WebP at approximately 85% quality |
| Page load time | Under 3 seconds |
| Consent method | E-signature linked to photo file |
| Background | Neutral gray or white, no patterns |
| Lighting | Two identical LED panels at 45° angles |
How do you standardize photo capture for consistent results?
Inconsistent photos destroy credibility faster than no photos at all. A patient who sees one image taken under warm yellow light and another under cool white light will not trust the results. Standardization is the entire game.
- Designate a fixed photo location. Pick one room or corner of your practice. Never move the setup. Mark the floor with tape for both the patient's feet and the camera tripod position.
- Lock your camera settings. Use manual mode with a fixed ISO, aperture, and shutter speed. Auto settings shift between shots and create color inconsistencies.
- Control patient positioning. Use a height-adjustable stool so patients sit at the same eye level every time. For facial procedures, photograph from the front, both 45° angles, and both profiles.
- Capture before and after at the same time of day. Skin tone and texture look different under morning versus afternoon light, even in a controlled room. Schedule follow-up photo sessions at the same time as the original.
- Train every staff member who takes photos. One person's interpretation of "straight-on" differs from another's. Written protocols and a short training session eliminate that gap.
Pro Tip: Take a test series with a staff volunteer before photographing any patient. Review the images on a large monitor, not a phone screen. Errors in lighting or positioning are invisible on small screens and obvious on a website.
For deeper guidance on presenting clinical photos professionally, the custom photography guide for medical websites covers equipment selection and workflow in detail.
What are the best practices for implementing a gallery on your medical website?
The technical side of a patient outcomes gallery separates practices that convert visitors into patients from those that just display photos.
Image optimization and loading
Compress every image to WebP format before uploading. Use lazy loading so images below the fold only load when a visitor scrolls to them. This keeps your initial page load fast. Serve responsive images using the HTML srcset attribute so mobile visitors receive smaller files than desktop visitors. Healthcare practices that apply these optimizations report patient acquisition growth up to 67% from their website alone.
Gallery interface features
The interface determines whether visitors engage or leave. Side-by-side comparison views let patients see the contrast clearly without clicking back and forth. A slider or reveal tool on a single image is even more effective for subtle results like skin treatments. Filter options by procedure type help patients find relevant results quickly. Every gallery must be fully functional on mobile, where most patients first research their options.
- Side-by-side or slider comparison views
- Filter by procedure category
- Zoom capability for detail-oriented patients
- Mobile-first layout with touch-friendly controls
- Alt text on every image for accessibility and SEO
Integration with procedure pages
A standalone gallery page is a missed opportunity. Embedding galleries directly on procedure pages reduces patient research burden and increases consultation bookings. A patient reading about rhinoplasty should see rhinoplasty results on that same page, not navigate to a separate section. Place a booking call-to-action directly below the gallery. The patient's motivation is highest at that exact moment.
For a broader view of how gallery integration fits into overall site architecture, the healthcare website design best practices guide covers patient engagement strategy in depth.
How do you manage consent, compliance, and ethics in your gallery?
Legal and ethical compliance is not a separate task from gallery setup. It is built into every step.
- Collect written consent before the first photo is taken, not after.
- Use a digital consent platform that attaches the signed document to the specific photo file in your system.
- Store all photos and consent records in encrypted, access-controlled storage.
- Never use a photo if the consent document cannot be located immediately.
- Review consent records annually and remove photos from the gallery if a patient withdraws permission.
Failing to tie consent directly to photo files creates what compliance experts call a "consent gap." This gap leads to HIPAA compliance risks that can result in fines and reputational damage. A centralized, encrypted storage system with direct file-to-consent linking closes that gap entirely.
For sensitive procedures, content warnings protect both your patients and your practice.
Using click-to-reveal features or content warnings for sensitive before and after photos respects the patient's emotional state, maintains transparency, and signals that your practice prioritizes informed, empathetic care over shock value.
Transparency and empathy are the foundation of patient trust when showcasing medical progress. A content warning is not a barrier. It is a signal that you take your patients seriously.
What mistakes should practices avoid when setting up their gallery?
Most gallery failures come from the same handful of errors. Recognizing them early saves time and protects your reputation.
- Inconsistent photo quality across the gallery. A mix of well-lit clinical photos and dark, blurry smartphone images tells patients your standards vary. Audit your existing photo library before publishing and remove any image that does not meet your current standard.
- Slow page load times from unoptimized images. Uploading raw JPEG files from a camera can push individual images past 5MB. A gallery with 20 such images will load in 15 or more seconds on a mobile connection. Compress every image before upload.
- Poor mobile user experience. A gallery that requires pinching and zooming on a phone will lose patients. Test your gallery on at least three different mobile screen sizes before launch.
- Placing the gallery on a separate, hard-to-find page. Patients who have to click through three menus to find results will not bother. Embed the gallery where the procedure is described.
- Missing or vague disclaimers. Every gallery needs a clear statement that results vary between patients. This protects you legally and sets realistic expectations.
Pro Tip: Run a Google PageSpeed Insights test on your gallery page after launch. A score below 70 on mobile means your images or scripts need attention. Fix it before you promote the page.
Key Takeaways
A well-executed patient outcomes gallery requires standardized photography, technical optimization, embedded placement on procedure pages, and airtight consent management to convert visitors into booked patients.
| Point | Details |
|---|---|
| Standardize photo capture | Use fixed lighting, marked floor positions, and locked camera settings for every session. |
| Optimize images technically | Use WebP at 85% quality, lazy loading, and a page load time under 3 seconds. |
| Embed galleries on procedure pages | Place results directly on the relevant procedure page to reduce research effort and increase bookings. |
| Tie consent to every photo | Use digital e-signature workflows that link authorization directly to each photo file. |
| Use content warnings for sensitive images | Click-to-reveal features protect patient dignity and demonstrate ethical, empathetic practice. |
What I have learned from building medical galleries that actually convert
Most practices treat the gallery as an afterthought. They collect a handful of photos, upload them to a generic grid, and wonder why patients are not booking. The problem is almost never the results. It is the presentation.
The practices I have seen convert best share one habit: they treat the gallery like a clinical protocol, not a marketing task. Every variable is controlled. Every image is reviewed before publishing. Every consent record is filed before the photo is taken. That level of care shows up in the final product, and patients feel it.
The detail that surprises most practice managers is how much placement matters. Moving a gallery from a standalone page to the relevant procedure page consistently produces more consultation requests. Patients do not want to go looking for proof. They want it right where they are already reading.
The other thing I would push back on is the instinct to show only the most dramatic results. Patients are skeptical of perfection. A gallery that includes modest, realistic outcomes alongside impressive ones reads as more honest. Honest galleries build more trust than highlight reels.
— Kate
How Epdwebsites helps medical practices build high-performing galleries
Setting up a patient outcomes gallery correctly requires technical skill, design judgment, and an understanding of healthcare compliance requirements. Epdwebsites has built professional websites for medical practices since 2009, with a focus on fast-loading, mobile-friendly designs that meet the standards your patients expect.

The web design and hosting features Epdwebsites offers include image optimization, responsive gallery layouts, integrated booking tools, and privacy-compliant hosting. Every site is built with the specific needs of professional practices in mind, not adapted from a generic template. If your current gallery is underperforming or you are building one from scratch, Epdwebsites delivers the technical foundation and design quality to make it work.
FAQ
What image format works best for a medical gallery?
WebP format at approximately 85% quality delivers the best balance of image clarity and file size. Pages using WebP load faster and reduce patient drop-off compared to JPEG or PNG.
How do I stay HIPAA-compliant with patient photos?
Collect e-signature consent before photographing any patient, link that consent document directly to the photo file, and store everything in encrypted, access-controlled storage. Never publish a photo without a traceable consent record.
Where should I place the gallery on my website?
Embed the gallery directly on the relevant procedure page rather than a standalone gallery section. Integrated gallery placement reduces patient research effort and drives higher consultation booking rates.
How many photos do I need before launching a gallery?
Quality matters more than quantity. A gallery of 10 well-lit, consistently photographed results outperforms a gallery of 50 inconsistent images. Launch with your strongest photos and add more as your library grows.
Do I need a content warning for sensitive before and after images?
Yes. Click-to-reveal features for sensitive procedures respect patient emotional responses and demonstrate that your practice prioritizes transparency and informed consent over visual impact.